Axiom v0.2.2
For users of the Axiom fork of the Halo2 stack.
This tutorial corresponds to the circuit type Halo2 based on Axiom v0.2.2. In particular, follow the guidelines described below if your circuitry is built on the v0.2.2 version of Axiom's halo2-base.
Introduction
Here we will walk through all of the steps to produce a KZG proof that certifies the result of an Ethereum storage query. All of the reference code can be found here. The circuit itself is based on a subcomponent of the Axiom ZK coprocessor. For more background on what Axiom does, see either their documentation or the original circuit definitions.
To better understand what this circuit does, you'll first need a primer on Ethereum accounts. While there are more comprehensive explanations available, we will provide an oversimplified example and the diagram below as a concise representation that specifically highlights the parts relevant to the circuit.
An Ethereum smart contract is a piece of executable code that lives on the blockchain.
The logic of this contract generally requires some internal variables.
For instance, a contract facilitating an exchange between two types of items may need to keep an exchange-rate variable.
Before triggering any functionality of this exchange contract, a user may want reassurance that the actual value of exchange-rate equals the claimed value.
Ethereum data has been meticulously designed so that it is straightforward to retrieve a chunk of data that proves the value of the variable exchange-rate.
Similar to a ZK-SNARK, your work as a verifier is to perform a series of checks on the proof data supplied to you.
In the diagram below, the boxes Block N, Account, and Storage constitute proof data, while the verifiers work consists of all the checks written in green.
As you can see, the work of a verifier is considerable and it is not feasible to perform this verification in mass on the blockchain.
Enter a circuit that performs all the checks listed below; a ZK-SNARK for this circuit produces a much smaller proof that is equally convincing with a fraction of the computational burden (for the verifier).
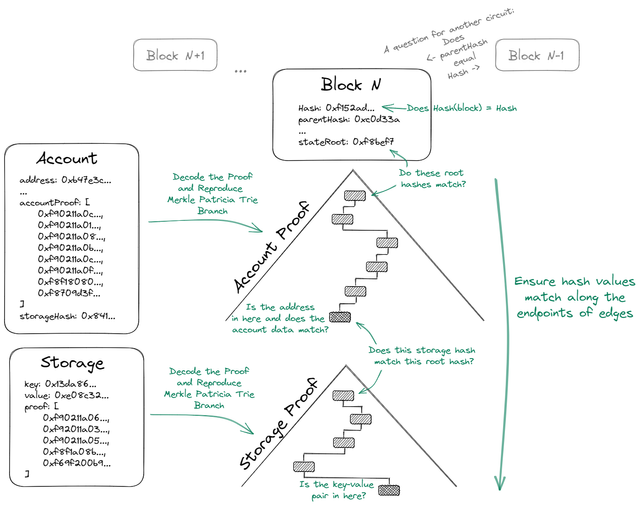
The circuit must perform all the checks written in green
Circuit Configuration
Our Halo2 prover is a package of its own that specifies your circuit, called axiom-eth in this example, as an external dependency.
Here is what the circuit directory would look like before you compress everything and upload.
There are some differences between the tree displayed below and what your local development directory might look like.
You might use code in /src/bin that we won't need.
However if your manifest needs that code to build, keep it in!
We also do not need any executable targets.
The main circuit is called EthBlockStorageCircuit (its definition begins on line 785) and is located within the storage directory.
📦circuit
┣ 📂src
┃ ┣ 📂bin
┃ ┣ 📂block_header
┃ ┣ 📂keccak
┃ ┣ 📂mpt
┃ ┣ 📂rlp
┃ ┣ 📂storage
┃ ┣ 📜lib.rs
┃ ┣ 📜mod.rs
┃ ┣ 📜providers.rs
┃ ┗ 📜util.rs
┣ 📜sindri.json
┣ 📜Cargo.toml
┗ 📜rust-toolchain
Before you upload any Halo2 circuit, make sure that you have checked off all of the following requirements:
- Your main circuit has implemented a
defaultconstructor - Your main circuit has implemented an
instancefunction which returns the public variables for any concrete circuit - Your main circuit has implemented a
from_jsonfunction which accepts a file path and loads the corresponding json inputs into a concrete circuit - The top level of your circuit upload has a
sindri.jsonfile specifying how to reference your main circuit
Below, we offer some more guidance on these four requirements.
- Default
- Instance
- From JSON
- sindri.json
Sindri's API generates prove and verify keys during the initial circuit compilation. For this reason, we will call your default constructor in order to lay out the circuit, independent of any sensitive proof inputs. The default constructor can usually be inherited if the input types to your circuit are not too complicated. In our example, we must implement a custom default constructor
This particular default constructor is merely accepting a prerecorded storage proof (the boxes Block N, Account, and Storage in the initial diagram) that has been hard coded as a JSON string.
impl<F: Field> Default for EthBlockStorageCircuit<F> {
    fn default() -> Self {
        let s = r#"
    {
        "block": {
            "hash": "0xf152ad7de1411489dd7bd38d958f1c826f3e98b348c77a2141cef101d6e2dbde",
            /*snip*/
        },
        "account": {
            "address": "0xb47e3cd837ddf8e4c57f05d70ab865de6e193bbb",
            /* snip */
        }
    }"#;
    let k = 16;
    let storage_pf_max_depth=8;
    let acct_pf_max_depth=8;
    use crate::providers::block_storage_input_fromstr;
    //block_storage_input_fromstr treats s as if its a runtime response from provider
    let inputs = block_storage_input_fromstr(s,k,storage_pf_max_depth,acct_pf_max_depth);
        let network = Network::Mainnet;

        Self { inputs, network, _marker: PhantomData }
}
For whatever circuit you submit, circuit.instance() is a function that returns a vector of field elements which are the public inputs to your proof, this is analogous to public signals in Circom.
If you do not have any public inputs, returning an empty Vec struct is acceptable.
Our storage circuit includes the following as its public input: a block's hash and number, the contract account address, and every storage slot+value included in the query.
Referring back to our oversimplified introduction, there would be only one (slot,value) pair: exchange-rate and its value.
impl<F: Field> EthBlockStorageCircuit<F> {
    pub fn instance(&self) -> Vec<> {
        let EthBlockStorageInput { block_number, block_hash, storage, .. } = &self.inputs;
        let EthStorageInput { addr, storage_pfs, .. } = storage;
        let mut instance = Vec::with_capacity(4 + 4 * storage_pfs.len());
        instance.extend(encode_h256_to_field::<F>(block_hash));
        instance.push(F::from(*block_number as u64));
        instance.push(encode_addr_to_field(addr));
        for (slot, value, _) in storage_pfs {
            instance.extend(encode_h256_to_field::<F>(slot));
            instance.extend(encode_u256_to_field::<F>(value));
        }
        instance
    }
}
The from_json function reads circuit inputs from a file and instantiates a concrete circuit from those inputs.
As you will see from the API commands in the prove step, proof inputs are supplied to the API as JSON string input.
This means you must make a network query in order to retrieve an account proof (aka, the boxes Block N, Account, and Storage in the initial diagram) and pass that as a the proof request.
On our end, we receive and send that file to the appropriate worker who will use the from_json function to initiate the witness generation.
impl<F: Field> EthBlockStorageCircuit<F> {
    pub fn from_json(
        json_loc: &str,
    ) -> Self {
        use crate::providers::saved_block_storage_input;

        let inputs = saved_block_storage_input(json_loc);
        let network = Network::Mainnet;

        Self { inputs, network, _marker: PhantomData }
    }
The sindri.json file tells us where to look for your main circuit.
Let's examine the required fields in relation to our example:
loading...
The two universal fields in the sindri.json file convey the name of the circuit and the circuitType, or framework, the circuit was developed with.
The packageName field is what we should use to load your circuit package as a dependency.
This should match your name specification in your Cargo.toml file (one of the first few lines).
The className field specifies the full use path for your main circuit definition.
The degree field allows Sindri to navigate to the correct size trusted setup file.
Finally, halo2Version specifies Axiom's v0.2.2 as the subtype of the Halo2 framework that our circuit is written in.
A good way to ensure that your circuit is compatible with Sindri's Halo2 prover is to copy the proving scaffold in src/bin/single_storage_proof.rs and revise any of the relevant circuit struct names.
If you can successfully execute that code locally, then it should be compatible.
Sindri API
We will use Sindri's Python SDK demonstrate the simplest way to upload your circuit to Sindri, compile it, and generate proofs.
The following codeblock will pull the necessary code, install any dependencies, and run the proving script.
You will need to replace <my-key> with your Sindri API key to authenticate all requests to the API (see Api Authentication).
# Clone the sindri-resources repository and move into the `storage_proof` tutorial.
git clone https://github.com/Sindri-Labs/sindri-resources.git
cd sindri-resources/circuit_tutorials/halo2/axiom-v0.2.2/storage_proof/

# Install the python SDK
pip install sindri

# Replace <my-key> with your own Sindri API key
SINDRI_API_KEY=<my-key> python3 compile_and_prove.py
The initial action this script performs is to initialize the Sindri API SDK and pass along your API key.
You can alter the verbose_level to 0 or 2 to recieve different levels of detail after each method is performed.
We set the verbose_level equal to 1 here to see the most vital characteristics of a circuit and proof but omit finer hardware and timing details.
loading...
Upload & Compile
To compile our circuit, we specify the path (relative to this script) of the source code.
The SDK automates the compression of this circuit directory so that it can be uploaded and compiled.
Our sindri.json file will be included in the tarball and indicates that the circuitType is halo2 and that axiom-storage-proof is the name of the circuit.
Uploading this tarball (via the abstracted create_circuit SDK method) will automatically trigger circuit compilation.
loading...
Output - Create Circuit
Circuit: Create
    circuit_id:   4812450b-33b8-4efe-b801-58ab3efbc3f1
Circuit: Poll until Ready/Failed
Circuit: Get circuit detail for circuit_id: 4812450b-33b8-4efe-b801-58ab3efbc3f1
{   'circuit_id': '4812450b-33b8-4efe-b801-58ab3efbc3f1',
    'circuit_name': 'axiom-storage-proof',
    'circuit_type': 'halo2',
    'compute_time': 'P0DT00H02M59.752935S',
    'date_created': '2023-12-13T22:17:16.575Z',
    'status': 'Ready'}
The method create_circuit method is blocking and the rest of the script will not progress until circuit compilation has completed within Sindri's API.
Notice from the compute_time field displayed above that compilation took a nearly 3 minutes.
Behind the scenes, Sindri's API must build its own proving executable which uses your uploaded circuit package as an external dependency.
This rust compilation time is comparable the wait-time you experience when you first build your circuit package on your local machine (in release mode).
After the code compilation process is complete, the API will produce the trusted setup keys. KZG only requires one universal trusted setup in order to generate prover and verifier keys. For BN254, we use the perpetual "powers of tau" ceremony, round 71. For this circuit, we must use a power of tau that is at least and the proving key is larger than 2GB. The production and serialization of the proving key played a large role in the compilation wait time.
Prove
In order to run a proof for this circuit, you would first need to retrieve a light client proof for a slot value of some smart contract account at some designated block.
In other words, you must make a network query in order to retrieve an account proof (aka, the boxes Block N, Account, and Storage in the initial diagram).
To generate the example input below, we retrieve the details about block number 16,356,350 and a storage slot in the Cryptopunks contract account at "0xb47e3cd837ddf8e4c57f05d70ab865de6e193bbb" via Infura's API.
{
  "block": {
    "hash": "0xf152ad7de1411489dd7bd38d958f1c826f3e98b348c77a2141cef101d6e2dbde",
    "parentHash": "0xc0d33af36f33cc4324e40b2e813e2114a8138fb168b8d2f25484d57a00ba0c41",
    "sha3Uncles": "0x1dcc4de8dec75d7aab85b567b6ccd41ad312451b948a7413f0a142fd40d49347",
    "miner": "0x690b9a9e9aa1c9db991c7721a92d351db4fac990",
    "stateRoot": "0xf8bef79a5edec709ff3d26126cbb2a8aa0da5ff80f6e3ffa16ec2c5d88ffab6f",
    "transactionsRoot": "0xef9762a488e6261436afac56eebfc793a2364e8b62e301a3115a0ca034870671",
    "receiptsRoot": "0xa39501c87cfe87e85aa510de8a4f14ee0662c5ee0dc4e38bc625d61913a67348",
    "number": "0xf993fe",
    // SNIP
    }
  "account": {
      "address": "0xb47e3cd837ddf8e4c57f05d70ab865de6e193bbb",
      "balance": "0x10d3603d5cb950e7e8c",
      "codeHash": "0xe2e7a7524a98ce629ee406c15c51a683e4167f0b74ea230566ddece7ae9d6f0b",
      "nonce": "0x1",
      "storageHash": "0x841cb606fbb15fb35132748ca8661dedf4f49c5049d006c36ea5360da82bf0df",
      "accountProof": [
        "0xf90211a0c9e4fc04f7a91b51e5e775b5f3212cfee90816fb0a675e9c7dd11b3a6e23c498a0cf0e901898c98a13edfbffb11576b1a2a6a991347e969af31612a6b462ca63f9a0decf132dd774a452307b6a3f887fcee0b99fbb7e74b527432b15461a19984423a080045acb124a2f19c1a39ff534beef9962f6ca86a954636a6f0d5eedca7383caa0e00069e52dc4b1525b58aca4a9990483c89236e376bb24974aead0613e0fe143a0dc2a16c9795f9740abf2ce3674b2a6d11e9e569ecbaa5425afc9611742ebc51da0e3e62bd4cd6aea039d85f2749d39889cde739a8aed3f109d4d5f84e4b64a5096a03765fc3e56705a90bfa88d6c25211fb68ac35758f6dc3ab97cba4f2052b9f5eda008abf80ff898f778f9061b7d37bb091bb2a4ca2566e38ad8c726e4b6aac71151a03124182279924e97c964b7cfcf17bf94b53fddf5b3e0ea66ee35965cbaa0a4f2a0387fb1aadb93050153228c00c7b8831d01d7b91f1eae28b0e52d5d2adae7c73fa09132f66c6b68c0e1d105c3e28da6a7be7a9579995f34ebe1c02fdb11a2f2bd6ea03f057e46dcac3c25188f66185738349e5072d7d5c39b577d44f62c21e8f7d611a0aa28f3c2e4d518faccd4a5d828c5ea1dd412bf5a9e9581e63d5fdfcd5d4ecf78a062447026ccc1d4a92ebfbd3079ac47c5d79dd932337e14b018d6ba92e3a8eb36a01d52196c05daa8dbf9610d4f0d31fd7f7a73b988bca934813157c5bc456b8d4e80",
        "0xf90211a01e50d27e59fe61d7fc95295acb30b3d6a0fa4b1e965f59b7c2919eaa23631502a07fd9ff9baba117a9b36c752efdc9ea7eb4978f5cc9ec349f5bec298bfe7a238da0f4f3b742871be22951fadfdf5d130a36d22faec89dd244312c4c8bb14e02553aa0a0873624e7121a9505a2714d6d3e1111cf4e4bcd35d63dff9f108925779668fea0a0a9ce55bfdbe7a48238d7b4765dbff584d718f56b91ea6bb48f2dc9bcfee4d8a0711e2d109b3e91550c42fd9822cc0b35668ca6a3f9170d94019b6d659f07fc10a0ca3be9d0e9d0da997506b18779d0018db9500c068a91e17151221d83a170bbfba000d47ad0456345ac6255aed8a1761407105b8370d5e3f67dd110797a4e9b7ddca0eca835d016f610862eb8c2455f9fde7498744ae714d603b173d2d94ac7b68d87a06afd191bfbe65e4c8482176c7bd6d67f04d0b7a84fa34a76254085fb3e1e1c38a0452479f9903d0c02ac370448b6bb03cb810c860a46bbcbba6a2d70e60fa1a3aba05f668c6d251c3274a658d6e524b5b66dbe127ed038fb5fea4228f1de3dd85f12a0c227f93324df1693b6f9a6a61d61ad2c52f08fb06090cdd59843d54d9561bff9a07ad1c53017b78b7356856b1f04340596fabed41b46d1df308546572e5b518393a078c6719c2486bbf246b1dcf5f39d89ebae82d6cb40401ece6ec6811798e8572ca0641173a3e88df7797dca7112b40f05c2a27936a3053067eb41bc0cec7a79c7b780",
        "0xf90211a08ea642a2d35ae6780131074cdcce73cbb13adaa15a34e96d47e88a8e1d527fdaa0fd83441873e59928c1e2dc51af73c55be063d77ce09dd673858efb1b90f24043a01aabdf02f5ccddf297d3403f00342b5697f17cac9babfb8ae96bf74e8c4b684ba063793cb9e94728f7aa252203607ee7761b9b4f419a3fb7dc408d972a07693214a0de2c71503a07d5c40b2df30160513b23709a6166546a03eb345d021a18da1d52a025dbb62ba36d3b285a8dd9a73c47ff10086ea147db64b42da4b6b717466d4dc7a0f790a3765f4951cba71ba391934f6cecb6242717b6d0f75fb7abcc412b3d7245a0dbcb8f7e73e2d2c7c4ff8b85ed9975786f56869d15758acc3d054fb433cce392a00bdd6784b77f29f81744cd657031b653effd5ba0e6e948c51d59567d3ff46ea3a05c90cd70a4cc7b9b9d90af8e919592da20199ab7f6920f36b5be383308ad911ba0198ef1d159eebbc7e3ff64f6b96afb2d444ec75b9e1d4826f4ab234724caba37a0e586a8317bd80cfff44841cc4258c7bdd1f657fd20014e20b398f0771ad523e7a029b677f247bce46a40c5f15c488ab5cdfb574a4403d9bffb27c1e9c70bed6921a0da245c05cf7840099df18ba944ecf57c15bc47357673267986340ab4ab9ef70fa0f2814c5fd35e5cd8d0798b26e4ba9a650e995bb3f01abf02d8eea5664c0007aca0487699b0109d603862086c860630fae06fa3d45079737637f088a2cbb059c31480",
        "0xf90211a0b9ab2564525f02dad287a95130254c079317c76461f2827d8f5389fb826ea6c7a0152b54cd4d775cc045a37a165850700c8842c5cdc7a9b78619856e94cae79a75a01e774ec1938a6c88c40e3da97bf7621aa9ad192056ec718c4604fb66fe33f444a0ec83e48dd3b2bd0866deeb634d261217a13cc3b723720686c09811257a3aea9fa0ff00d9760361a5c8b07ae5d8a5d89f1522bf64b9f222f04f3b565a93ffef0eb6a033d6eadcf568abbb08761cbd11040ecf9c20942e519140f9c97bf8992aecf95aa05725ff93a8628df105e49471a5cd6c0cb03a3bcd5e933f6bf77c8dde8c3c5988a013fc45665bdf530dc5ba871fcb6c9335fbdb95abd36e0eb007acb3041058e56aa0450afa6df06443f30c5dae3bb37d655a3c5c95952998792e08392861ebd43e74a09fd46e66e68ebdda80775433a5aa96196d055732e5fec78ba98494b42398cb75a0450182fda695a66956b9a89010b7e179bd5d38e3744fae13a4b0a7714b08c714a01dd65d7e98fee158adf4bec3c16b39034839fba90a33d52a65787eab5d5d1e9aa0a5500110e38883ff730c44ab9c7efe0ef006a7a29e8b86000bc50c56a3179c2da00f208a0ce0eaf125bfd6f97357b64685ece5af1918f60d4fbe01736701c2eaeda0961888874a11af9bfb571a9324d9216bb74ca407f81023b6a364fd8b61b74e2ba08e4150a038c3ac3772e2db11f4048224cea56f70d5f41b6ca6b4ca5af920e54b80",
        "0xf90211a0c526180429b8eec6eba7de835a7141bed64d6c563e6c30c4ff8bb05f1689b72ea0c4b277acbc788d01b055726b132e05447d7e941c21a37741b92f1847df3ea2c8a072f376d6b9e709d5e49417b7619b3269ee422f6c430e5cf8aaece7daef6eaca1a0834678c04baa71604efc825cdbd096c4f2390593846c3537684718f82d382526a0be154eb528364547b16d8511326c5a857b9ce974ce4e2ececdabb39fd5ed6226a03ee82140f89a97546ac145df76f94375aeb923cd590157c54090f7e0a3a73468a079dd4800d26331f64675c4d934e83b59f2598f46986d52bbf7a5a50d1dd133f2a0f58ce3679ed536daa72b72ddcdd0dedee3cea07e2191c35361f1784e7f3d84afa06746f728649fea30302a09dc7da6992e103904d19615f7aa128c403a3fb4f47aa00975fae22114b798631f9e19ffb9ec4af56b1db2025cae45f4d669ccef6f56f4a06124f9a9d882963fe9e3b1ac2616912f12b8701752090259346d53304792a6daa00176d58e8a4c49e88343cf653ed8ebe3d71c50b501eea58d90fe6a8691ff12f4a088c73544acd0c84c9e67febee417e9d9f0586efa34998a57f3ea9ce93d214479a0afe1e62b4a2b97a30edba7114ebdb996feefabe049dcb954a296b84138ef3d37a09b4fcb84b8eedb0ee10e120861a4fcf3e7f233d8ee2619169e4600c297472a60a02ca2c2c5eb70355a4aed661ce2a26d8e8ddf41fa583202b69151c8043ecf7e5880",
        "0xf90211a0fe802cc20f884ad71df355f4e87178de529967845cc71ea50c1e84f15b8d7fc4a07e6e91ccf3b7d2504b3dde18ae753ffc6e427398082c9d811bc7e097aa6ded87a0832ffab76e6dd0615a2d8894faad599016c8ce9408e9ea082798df7541f59697a00ee266c73038cbba8e23f92fb584b03a0c2435968c3d5aa1e3a650f63b0a8808a0e474e7851ce650ca7b8a23a7f052f85f081550c0d4753aef638a8382e8e3addaa05e40547e9cf3258e69d7371e7109f131928275d7907750b91b689d838ad20692a03acee740dd3779c048b0a0eaad21d279af81479eac2355bc35086bfcbb294e40a0afe8ca8a18ca6fea62cea7ebf9c0ec199bbb0fc928ca558fa57879bd2f9c5896a07f05b1c8946224e64c6b0f08538d9a8aaeb8e028c058329723994e92e57fed01a0fa0a92403bcf280b011b69e11f72c81913a84e2cfa0e73505e3ba85b45c6d198a0b9e1da6493acffd539c1fb56a45681ae4b2bcb8f9c77708e6de8bf244e755abba086ea90b6b4bb2f61d8d2b450321dfb5fb6feaf6b65377ece6687408bf9b2912da07549fa146ce97d39a62845e395d8f45840cea1b7f948deef25ab56e025709cd8a0e1c00f534afba3ecfe1bde3065fc227f5e3a630e621033457239cbd27ee38798a02f20e595c6fa4f443ebf75b38ea4b10ca3666d748931dce34e836fc8b2549faba0deed3e88e193d7bdad0a30a61eed5c0d7562c01c04cb9252da6eff59cbe6972380",
        "0xf8f18080a0b561e85842111223038fd7ef285abf8af348d3f49fdb2a4a6a1976f0a077506980a060e1c6c38ccdc96efaef7dbe161b9e612b4013014e5cc660a0b4cd224024e01f8080a094be361a9ee84da5a699b77e9c999dde4850a31a0dd019130a390613481c36e4a06b9e989cf29f77bc45584c8ad68b1f94c543baee8a1b0f110f528682817b0d9580a0d3e54d8fcf85c438cd773cd432fcaa0d704f6259f9e8a54c938650cd61ee000ca06405ec9caf9e5c8413866d4b68bb46812d2bfdef2c873afc80ab87beb6554de2a03e719b8a8c9fa923e3bfa639c832967256a3532ef23e4a307204510ca8c2cff180808080",
        "0xf8709d3f8c7fab57471a2a41387f9b0d0eab229457c5024bd6cfb72dd7bba2feb850f84e018a010d3603d5cb950e7e8ca0841cb606fbb15fb35132748ca8661dedf4f49c5049d006c36ea5360da82bf0dfa0e2e7a7524a98ce629ee406c15c51a683e4167f0b74ea230566ddece7ae9d6f0b"
      ],
      "storageProof": [
        {
          "key": "0x13da86008ba1c6922daee3e07db95305ef49ebced9f5467a0b8613fcc6b343e3",
          "proof": [
            "0xf90211a060252d195860939219df3716cb285660bd749cb2e71aced70161504f702ff38ca06210c127c590fb12768f04e8793f5c9b35cf8db2cf41f668bb5eacef3c30b2c4a0789aca4da06a78f6423c9bcff43cd048b304e5b6fc3609016294b52d5b6676aca08af8197ed18722d092f045be108791a65aad5976d573f840dd04ac7104335658a02e752a1f660263001144a2cceddf9c7f994de89d83df2f42ebf6f8b8027113b9a06745c84e3a033107857a844d60617a628effac29c82f18f323087e3e18bbe152a0952508605c8c0efa69c2d9eb29712fbd3fffa1ac0321432ccc5feade9cf97627a026960a36654a084da4a53dae9fd006fce46e77960a23d86736fc9b5aca4b925ea0363ec9f1730e0634e4a16fa077651247352dd16bd73db6d37bfd87892613d18ba0f7be2c53d3bb24c89a4bc51afc628e7f405ddf849e46d267ad576039ca326645a075f5a66afe20ddf0e1b525c0b15ee2c61fa1f7eb311859b3fd098d4b2978de27a04656cd4e1bab1c907d32f3884a0b34220ea80774dac5a29fb0616369cf274c11a03e3af59105ef1a3e8ae7d61b45f913766324d64e3bf577baf442cbf6c555d8b2a035e06cd495849b7fb2c6a175a30e22f78a4475f28b0de4025a9c49836f737082a061ac9b7f5825e5ac5f96cb366df00b227cc62a7bd8460e1d3ab9567a693c2b9fa033d577f9add045a435f41b814d70ca0b0d2735e74dcf8b1d4b5f04a4923e45b480",
            "0xf90211a03fb758b635db89b71f610d2657590bfb2f1560f925962df48532f79be5283d76a0142444f97cc3aa7533521706788b11339354b4cbe352c11d672db90b0d6fdcb3a022239d6bf9b90fcf67c2b2875ad98b4e6e0dbc6601c41378fbc229db96d8712da00bb86c97bdc035a8341410aa4898e55e6d98af365702d421f768a6443ddd1386a0d1807dbc8b1974def62740e95fd80d6e80d102c90dea31aa1fedb41b22a23d87a0f0b412cbc3bc1024fab380871bf6720e44a62f91510fdc41ed8b1c52e33bd991a0bdb50097ebf1deff39e72fc6e035461cd946005e9aa68505c281f0a8231286cda089ff51406ba16f88e511f7544796fd0a1d7b4fdbc10f7bce5a1a3def49f7ad8aa07dcb3a87c0edcfbd974eb696bee69ea6b5ac8d93b9bd2c2c2a9f0249f50fb3aca056a34da1bc930167bdf97e9f1328a8d217deb91ee3f6e66cbce114b93eebf951a0215cd46425f3ba378a0e579caf4460813fb9a88f7f16455ff8fa8f1845ec0445a00c93cf7be4f553c0b60288cd89117beacc144ee70dc0a39780ad1120b04ac67ba001f71899364477b33fd0126f43656cc9b53612438f7a26f039e5b102f97ee018a05b63bef9d1924041b93febe38e68238a345b70940b719a590956f1cd31c9fcbba0e405622bf9a63735e72b40d0960581d8f1cc0a5bd9efd5d1282ed232c515d322a03c7add9b013ff8f3654a95b8efa42ed098928e60ecf9eebb1f6159d458f9160e80",
            "0xf90211a0587ebbf59a619da308c15525bd0ddbbec75f42261bb502604c81f48113e9b6eba0ead73847aa84dec1093fa40a5f78a7a8c39cd45c32041a9c01c7a8cb030f3034a00c210c8e180468799bc26608c637817eadd4168445039879ec418da237436604a001cafc8a7f4728bf2afeb4f5f841bbaff92943b8a631d70228bb2021a2255862a070d6f25250d485c8a7250e810d21cc20a252efcf60a676e3ddd1ca3dafb123b7a065a2ff940acd03d2c93101ec97236c4fa3a3a593be9c4882f49215f4163d3c98a09c2b4bb6f6c6d4ad30c6e959ad224f2fb1cb7792ffe84d1f8b3e160c26911953a0f71584c68ee3cbae0107923ff0cf46ff461c451c526a746d93bee9e325f4ba67a017ba5ae5913e21ab8257e97cde204a69d5aa09d9f300cfcf3cabd28c2906df51a0106deacc39677eddd310a000b078ff1bcf8b6a08a28de4655dfeaf2496d7f6a0a0180a1d1662e98f83aeac6397fa3cf049a770a9560bcdab9e92c74d852c3403b3a0bc5704dfaef66221b061f9a040c8bec2aec42d12100e45fab425affeffdd4a18a06b3f302cf3c83c7f7cff2d6361734abe3ab8bd0feac33e0bc8297c05a8dcc30aa041fd229078ab04fa2e8a8a667256914c98a983ef8d999d00a5a3112ddc7d140aa02de44e11c8094583d7c00bd2061fab8531c8d3c8686905e1a14824e817898b4ba0827638d5fd5697543ce110e8899e27e09f5ae28cc5e447a7351f75a84b44f98280",
            "0xf8f1a08b59042d7dc9e951b13b7f2e64195d539a4956260c422ac3a7bbfc1be7406b38808080a0496aa1a457432e801b32a427e192e8425f62bf6fbb174fc68037478cc4c89cfc8080a0545f004f920066bd719b50e46938c9fcd8fd86f658da6409f2e12156574ae977a0e46be32f90c4c8de23a8b29f6057cdd964415dc63a5b52c01d87ffa84cb18f00a012eadacd1fc4cbdd537c33bbab21f3acb481784598410421ad36c43ba19dfbbfa0397cdb9a0ba2086382937ddd86db84961dc4e86ce2be3e103f24276fe4302509a094f91eae8184b46734e2d0937d9bad9222039a6cce993b95debd03622ee36c168080808080",
            "0xf69f200b972c470f18f842c35c712f9b9beaac1e8e838c1ba491d0d478900e81ca9594e08c32737c021c7d05d116b00a68a02f2d144ac0"
          ],
          "value": "0xe08c32737c021c7d05d116b00a68a02f2d144ac0"
        }
      ]
    }
  }
The JSON file above is loaded and sent to Sindri's API via the prove_circuit method, as seen below.
loading...
Output - Proof Generation
Prove circuit
    proof_id:     5120d8c7-28b2-4035-ac1f-8d98a4691632
Proof: Poll until Ready/Failed
Proof: Get proof detail for proof_id: 5120d8c7-28b2-4035-ac1f-8d98a4691632
{   'circuit_id': '4812450b-33b8-4efe-b801-58ab3efbc3f1',
    'circuit_name': 'axiom-storage-proof',
    'circuit_type': 'halo2',
    'compute_time': 'P0DT00H01M22.470786S',
    'date_created': '2023-12-13T22:20:38.447Z',
    'proof_id': '5120d8c7-28b2-4035-ac1f-8d98a4691632',
    'status': 'Ready'}
Behind the scenes, the prove step creates both an instance vector, or output from the circuit, and a proof.
We can access both of these via proof_details method within the SDK or by setting the initial verbose_level to 2.
Both fields are encoded as base64 strings.
This tutorial omits the post-processing steps of decoding the public field returned from the API and verifying the proof.
To accomplish that, you can revise the verify.rs program described in the Axiom v0.3.0 Guide