Gnark
For users of the Gnark stack.
This tutorial corresponds to the v0.9.0 version of Gnark with the Groth16 proving scheme and BN254 elliptic curve.
It should also work with v0.8.1 if you're still on an older version.
Introduction
We will walk through the process of generating a proof capable of verifying the result of a simple compression algorithm. The complete and finished code can be found here along with other example projects in our sindri-resources repository. You can also check out the Gnark documentation for more general background information on using Gnark.
Compression Algorithm
The compression scheme that we'll be implementing is a form of Run-Length Encoding (RLE) with a fixed-length encoding. Here's how this lossless compression algorithm is implemented:
- Scan the input string of bytes sequentially.
- For every distinct byte, record the byte once followed by a count of its consecutive repetitions ranging from 1-9 encoded in ASCII.
For example,
ccccbecomesc4andFbecomesF1. - If a byte is repeated more than nine times consecutively, it's chunked into groups.
For instance, twelve repetitions of the byte
bwould be encoded asb9b3.
The ASCII encoding of a limited 1-9 range was chosen solely to make string representations more understandable for the purpose of this tutorial. You could trivially extend this to a range of 1-256 to take full advantage of the repetition-count bytes and improve the compression ratio.
To get a better feel for the compression algorithm, you can enter different input strings below to see how they're encoded.
Give it a Spin
Enter any input string to see how it's compressed:
rrrrrr5kkkkkkk6MMMM3ssssssssss9sssssss6JJJJJJJJJJ9JJJJJJJJ7r5k6M3s9s6J9J7While this compression scheme is a toy model, it highlights several foundational principles that underpin more practical algorithms. At its core, the model captures the essence of pattern recognition and substitution, a concept that's central to techniques employed by algorithms like Lempel–Ziv–Welch (LZW), where recurring patterns are substituted with shorter representations. Additionally, the toy algorithm's approach to breaking down and encoding longer sequences mirrors the segmentation seen in Huffman coding, which prioritizes frequent sequences for shorter encodings.
Circuit
In the previous section, we described how our toy compression model works in terms of input and output strings. Our circuit will operate on byte arrays of these strings encoded as ASCII. There will be two input variables to the circuit:
Original- A 100 byte array encoding the input string. This is a secret input to the circuit and need not be disclosed to construct the public witness and verify a proof.Compressed- A 200 byte array encoding the output string. This is a public input that will be disclosed and is necessary to construct the public witness and verify a proof.
The small annotations in this figure are meant to illustrate how the repetition counts are mapped from ASCII to bytes.
The ASCII character for 3 is encoded as , and all other digits share this offset of .
This was done to make the encoded strings more readable, a more practical compression algorithm would likely be operating directly with bytes in the first place.
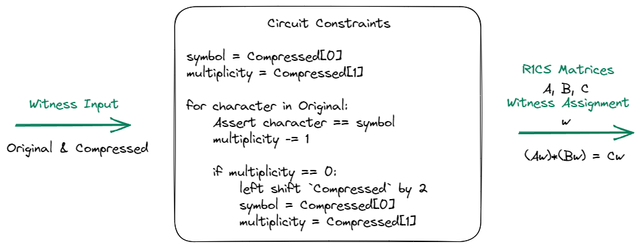
Our circuit will verify that some Original input array which compresses to Compressed was known at the time of proof generation.
This is a relatively loose constraint, but you can imagine how this might be extended in a real application of a compression circuit to verify that a private uncompressed input with a given public hash input compresses to a public compressed input.
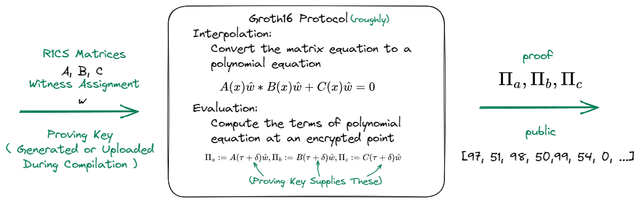
We'll use the Groth16 proving scheme to generate a proof for our circuit.
Circuit Configuration
The circuit is organized in a circuit/ directory containing these files.
circuit/
├── circuit.go
├── go.mod
├── go.sum
├── input.json
└── sindri.json
The go.mod and go.sum files are the standard Go project files for defining a module and locking its dependencies.
These should include any dependencies that your code uses, including any Gnark modules.
For detailed descriptions of the other files, you can click through the different tabs here.
- sindri.json
- Circuit Definition
- From JSON
For any circuit using any framework, you always need a sindri.json file defining certain metadata about your circuit.
There are a few key pieces of information here that are required:
- The
packageNameandgnarkVersionmust be included and match the values in yourgo.modfile. - The
curveandprovingSchemesettings specify the Gnark proving scheme and elliptic curve. - The
circuitStructNamespecifies the name of the public interface in your Go package which implements the Gnarkfrontend.Circuitinterface (see: Circuit Structure).
Your circuit package must include a circuit definition in accordance with the Gnark framework documentation.
This means that there must be a .go file including a struct which satisfies the Gnark frontend.Circuit interface and contains both your public and secret input variables as frontend.Variable fields.
To meet the requirements of the interface, the struct must have a Define method defined on it which implements the circuit logic.
Make sure that your circuit's struct name matches circuitStructName and the package name matches packageName in sindri.json.
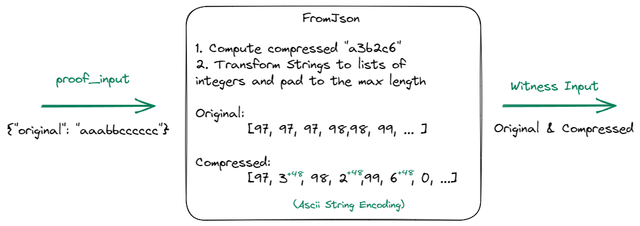
Your package must also define a special func FromJson(pathInput string) witness.Witness function which takes a file input path pointing to a JSON file as a string, then reads in this JSON file and constructs the full witness from the inputs described in the file.
This gives you the opportunity to map a more ergonomic input data format to the final input format required for your circuit.
With our compression circuit, our FromJson() method allows us to specify the original input as an ASCII-encoded string instead of an array of byte values (see example-input.json for an example).
Here is how we implement that mapping and construct the witness.
We also define a small boilerplate func ReadFromInputPath(pathInput string) (map[string]interface{}, error) function which this uses to read in the JSON file.
This can be copy and pasted into any Gnark circuit's package because it doesn't depend on the circuit or witness in any way.
Sindri API
We'll walk through the steps to upload your packaged script to Sindri, compile it, generate proofs, and verify proofs.
You can interact with the API in the language of your choice; we'll use JavaScript with form-data and the axios request library here.
Each code block can be copy and pasted into a node REPL sequentially, or you can download the full compile.mjs script and run it all at once with node compile.mjs.
The easiest thing to do is to clone the sindri-resrouces repository and work within the gnark/v0.9.0/compress subdirectory because that will ensure that you have not only the script, but also all of the files necessary for the commands to succeed.
# Clone the Sindri resources repository and move into the `compress` tutorial.
git clone https://github.com/Sindri-Labs/sindri-resources.git
cd sindri-resources/circuit_tutorials/gnark/v0.9.0/compress
You'll need to install a few dependencies before you continue.
# Install dependencies from `package.json` if you've cloned the repo.
npm install

# Or...

# Install them manually.
npm install axios form-data tar
You'll also need your Sindri API key to authenticate all requests to the API, so make sure you have this ready (see #api-authentication).
You can either modify the script to include your API key directly, or set a SINDRI_API_KEY environment variable before running the compilation script (e.g. by running SINDRI_API_KEY=<my-key> node compile.mjs).
The first chunk of the script simply imports the dependencies and configures axios to authenticate with and use the Sindri API.
Upload & Compile
To upload and compile our circuit, we first need to create a gzipped tar archive of our circuit directory and upload it to the /circuit/{circuit_id}/create endpoint.
Our sindri.json file included in the tarball indicates that the circuitType is gnark and that compress is the name of the circuit.
Uploading this tarball will automatically trigger circuit compilation.
Output - Create Circuit
Circuit ID: 88433990-ca2a-4060-92ec-0acbeff1e3b5
The returned circuit ID can then be used to perform additional operations related to the circuit such as fetching its current state or generating proofs once it has compiled successfully.
In fact, we will immediately use this ID to poll the /circuit/${circuitId}/detail endpoint until the circuit status is Ready.
Output - Circuit Polling
Polling succeeded after 28.4 seconds.
Output - Circuit Detail
{
  "circuit_id": "88433990-ca2a-4060-92ec-0acbeff1e3b5",
  "circuit_name": "compress",
  "circuit_type": "Gnark",
  "date_created": "2023-10-26T17:33:00.553Z",
  "status": "Ready",
  "version": "v1.4.3",
  "compute_time": "P0DT00H00M18.553732S",
  "compute_times": {
    "total": 18.55373217887245,
    "queued": 10.540048,
    "compile": 11.976261832984164,
    "clean_up": 0.00571231497451663,
    "file_setup": 0.3128799251280725,
    "save_results": 1.6724711069837213,
    "extract_code_tarfile": 0.003556526033207774,
    "compile_r1cs_and_keygen": 4.582673318916932
  },
  "curve": "Groth16 bn254",
  "degree": null,
  "num_constraints": null,
  "trusted_setup_file": null,
  "verification_key": null,
  "error": null
}
After circuit compilation has completed, we're ready to generate proofs for arbitrary circuit inputs.
Prove
We can generate new proofs using the /circuit/${circuitId}/prove endpoint, and then follow a similar polling pattern with /proof/${proofId}/detail endpoint until status is Ready.
Output - Polling
Proof ID: 94de088e-8230-4be0-83b3-3172dfb56990
Polling succeeded after 30.4 seconds.
Output - Proof
{
  "proof": "EGYGn6LyytKEF/Lt5yIsG9fORsU9rRHXaEc+RJl+6foJJfF3RTz7JZje5++gYO6UMPSIYOlsbhLYqTL8FPJqRAIZ0pKhUAp/ZqVQ2nf179zApiGVA9XOCZjv6i4UcQ/LEWba72jkZ99CJh+EdUwMRBRAm9QgVtB20PPzyBAPx14V3Owfi6a0miJCfj4CmjEbEZgVIub0TX8y1xQD1JwLsCVwbM3lc8bHS64I21NPf1M3SdCzvB0eRk6rj16xZlzCK0lrO9j3lCdRfcgvh/hzbEScgoeXoOfYHzoD1qu2JQQlOl4Lu80f6eNM2kXVWMzgVHWPDo5WgCgY/YlNLeAFUwAAAAAAAAAAAAAAAAAAAAAAAAAAAAAAAAAAAAAAAAAAAAAAAAAAAAAAAAAAAAAAAAAAAAAAAAAAAAAAAAAAAAAAAAAA"
}
Output - Public Inputs
{
  Original: [
    null, null, null, null, null, null, null, null, null,
    null, null, null, null, null, null, null, null, null,
    null, null, null, null, null, null, null, null, null,
    null, null, null, null, null, null, null, null, null,
    null, null, null, null, null, null, null, null, null,
    null, null, null, null, null, null, null, null, null,
    null, null, null, null, null, null, null, null, null,
    null, null, null, null, null, null, null, null, null,
    null, null, null, null, null, null, null, null, null,
    null, null, null, null, null, null, null, null, null,
    null, null, null, null, null, null, null, null, null,
    null
  ],
  Compressed: [
    114, 53, 107, 54, 77, 51, 115, 63, 74, 64, 0, 0,
      0,  0,   0,  0,  0,  0,   0,  0,  0,  0, 0, 0,
      0,  0,   0,  0,  0,  0,   0,  0,  0,  0, 0, 0,
      0,  0,   0,  0,  0,  0,   0,  0,  0,  0, 0, 0,
      0,  0,   0,  0,  0,  0,   0,  0,  0,  0, 0, 0,
      0,  0,   0,  0,  0,  0,   0,  0,  0,  0, 0, 0,
      0,  0,   0,  0,  0,  0,   0,  0,  0,  0, 0, 0,
      0,  0,   0,  0,  0,  0,   0,  0,  0,  0, 0, 0,
      0,  0,   0,  0,
    "... 100 more items"
  ]
}
The proof detail response contains everything that we need to verify the proof locally.
Verify
Finally, our compile.mjs script writes out the full proof detail response to a local JSON file.
The output is quite large because it includes the base64 encoded verifying key and proof, but you can view an example proof-detail-response.json on GitHub.
The proof detail also contains the public proof inputs as we saw above in #prove, so it has everything we need to verify a proof locally.
Here is a simple Go program which parses the JSON proof detail response content and uses it to reconstruct the proof, verifying key, and public witness using Gnark structs. It then verifies the proof or raises an error if verification fails.
To compile and execute the verification code, you can run the following commands.
# Compile the verification program.
go build -o verify verify.go

# Verify the proof in the JSON response data.
./verify proof-detail-response.json
Output - Proof Verification
14:10:13 DBG verifier done backend=groth16 curve=bn254 took=1.970676
Proof verified successfully.
As the output shows, our proof was verified successfully!